A step-by-step guide, from scratch, to practicing spec-driven development with opencode and InkStone’s free models.
Over the past few months I have been using (and teaching) Spec-Driven Development with OpenSpec. The idea is simple and, for me, it changed how I work with coding agents: before a single line of code, we write down and review what is going to be built. Proposal, requirements, design and tasks become versioned Markdown files, and only then does the agent implement.
A question I get all the time is: “how can I practice this at home without spending anything?”. This article is my answer: the full SDD workflow with OpenSpec, running on opencode, an open-source coding agent, and free models such as DeepSeek V4 Pro, served by the InkStone (Intern Discovery) platform.
I recorded every step. The videos are sped up during the waits, and below each one I note how long it actually took. That matters: the service is free, but it is not fast.
What We Are Going to Build
- A dedicated WSL instance called
sdd-lab: an Ubuntu running inside Windows just for this study. If something breaks, you delete it and start over without affecting anything else. (On Linux or macOS, skip this part and start from Node.js.) - opencode: an open-source coding agent that runs in the terminal and talks to any OpenAI-compatible provider.
- Intern Discovery / InkStone: the source of the free models (more on it in the next section).
- OpenSpec: the spec-driven development framework, with my public openspec-casadei schema on top.
- A real first spec: a Node.js CLI called
wordcountthat counts the lines, words and characters of a file. Small enough to fit in an article, complete enough to go through the whole cycle.
This is the OpenSpec cycle we are going to run:
What InkStone Is (and Why It’s Free, for Now)
Intern Discovery, also called InkStone (书生·端砚), is a platform from the Shanghai AI Laboratory built for scientific research: paper tools, topic spaces, research apps, scientific data and compute. Alongside all of that, under the Research Models menu, it offers API access to language models such as DeepSeek V4 Pro, DeepSeek V4 Flash, GLM 5.3, Kimi K2.6 and Qwen, with endpoints compatible with both the OpenAI and the Anthropic APIs.
At the time of writing, that access is free, with quotas per time window, and the menu carries a Free tag. I don’t know how long this will last: I couldn’t find any public date or policy about the end of the free tier. So treat it as a temporary opportunity to study. If it ever stops being free, nothing you set up is lost: opencode accepts any OpenAI-compatible provider, and switching providers means changing the URL and the key in opencode.json. opencode itself also lists a few of its own free models under /models.
Before You Start: Safety and Expectations
Use a Disposable GitHub Account
Sign-up on the platform is done through GitHub login. I strongly recommend creating a brand-new GitHub account just for this, with an email address that is neither your personal nor your work one. The OAuth login asks for access to your profile data (“Personal user data — Full access”), and with a disposable account you don’t expose your main account, your repositories or your organization memberships.
Two more rules:
- No work code, data or secrets. The service is hosted abroad and falls under different data protection laws. Treat it as a study environment.
- The API key is yours alone. It lives in a file that only your user can read, never in the repository, never pasted into a chat.
Free, but Not Fast
The full wordcount cycle took, by the clock, about 10 minutes for the propose, 6 minutes for the apply and 5 minutes for the archive. With faster paid models, the same exercise takes a fraction of that. For studying, it works very well; for day-to-day work, the speed is a real cost.
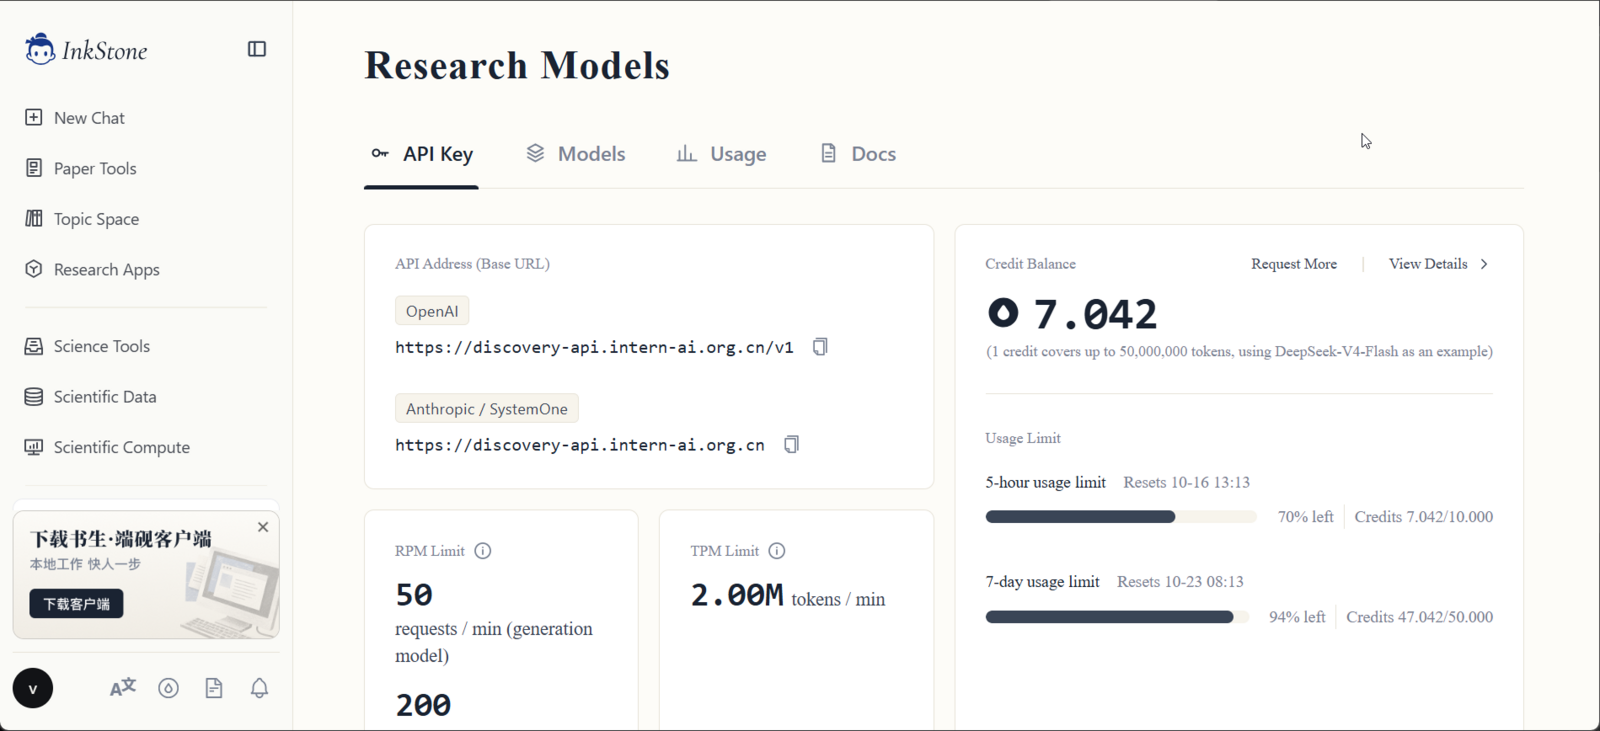
And the quota is more than enough: the whole exercise, from sign-up to archive, used about 30% of the 5-hour limit and 6% of the weekly limit of the free account.
Part 1 — Account and API Key
Signing In to Intern Discovery
The home page opens in Chinese, but there is an English option in the top-right corner (your browser’s translator works too).

A heads-up that will save you time: the platform offers email sign-up, but the site’s firewall blocks it. The button simply does nothing, and the browser console shows a 405 Method Not Allowed error with an Alibaba Cloud firewall block page. I tried other browsers, incognito mode, another network and a VPN, and the block remained. GitHub login works, so go straight to More login options → GitHub.
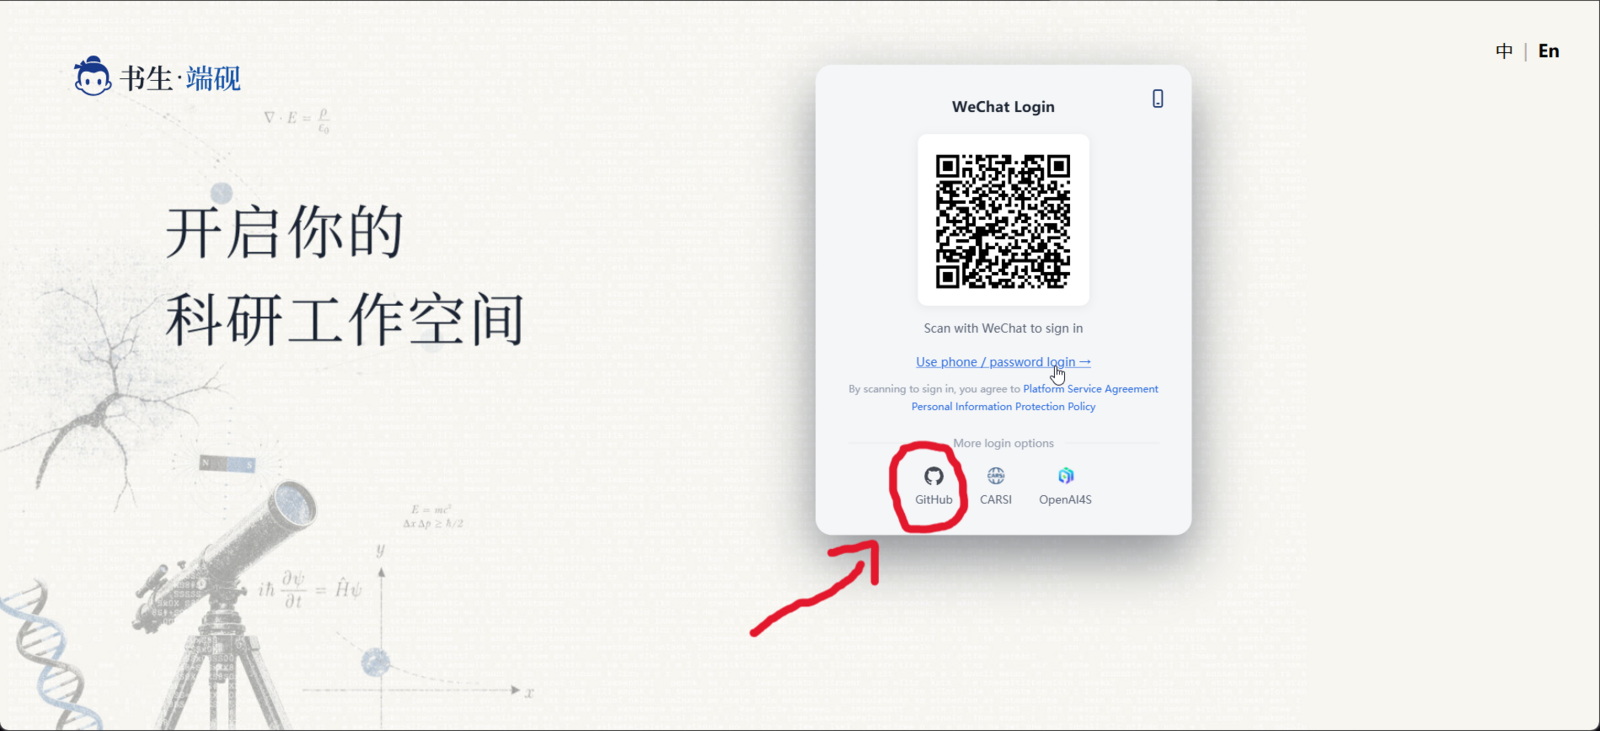
⏱ Real time: 39 s.
Creating the API Key
After logging in, the side menu has a Research Models entry tagged Free. That is where the API URL, the account limits and the keys live.
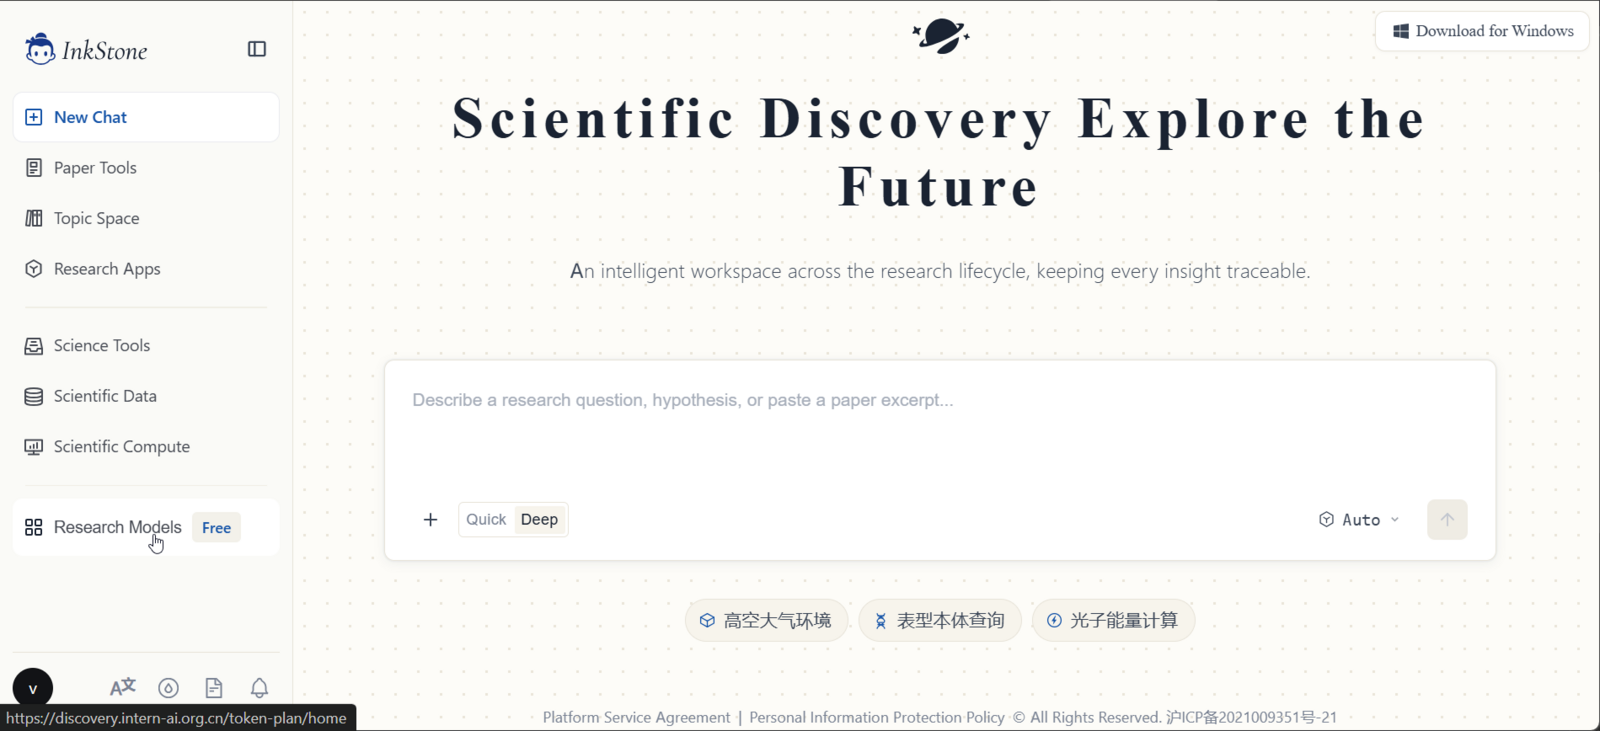
The free account limits, at the time of writing:
- 50 requests per minute for generation models and 200 for decision models;
- 2 million tokens per minute;
- Credits with a 5-hour window (10) and a weekly window (50). According to the platform, 1 credit covers up to 50 million tokens, using DeepSeek V4 Flash as an example.
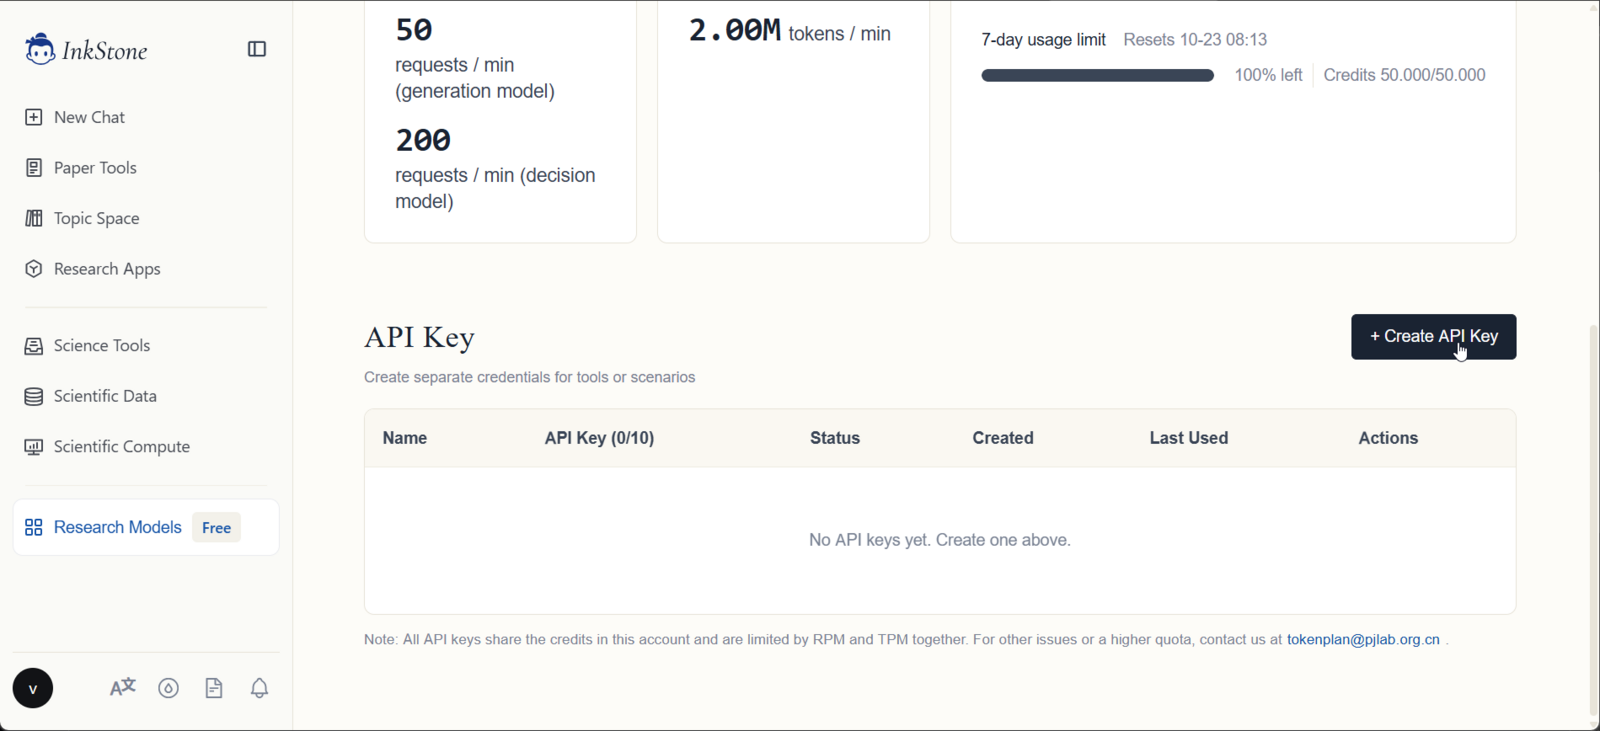
Click Create API Key, give it a name and copy the key right away: it is only shown in full in that dialog. After you close it, the list only shows the masked value.
⏱ Real time: 24 s (video sped up). The key shown in the video has already been deleted.
Part 2 — A WSL Instance Just for the Project
In Windows PowerShell, we create a new WSL instance with its own name. If the --name option isn’t recognized, run wsl --update first. The official documentation is at learn.microsoft.com/windows/wsl/install.
wsl --install -d Ubuntu-24.04 --name sdd-lab
It asks for a Linux username and password and drops you inside the WSL instance. There, we go to the home directory and create the workspace folder:
cd
mkdir workspace
cd workspace/
⏱ Real time: 1 min 22 s (video sped up).
Then we update Ubuntu:
sudo apt update
sudo apt upgrade
⏱ Real time: 1 min 17 s (video sped up).
Part 3 — Node.js, opencode and OpenSpec
Node.js with nvm
We install Node.js inside WSL, using nvm. This matters: WSL sees the Windows PATH, and it is easy to end up running the Windows Node (or opencode) without noticing. More on that in the troubleshooting section.
curl -o- https://raw.githubusercontent.com/nvm-sh/nvm/v0.40.1/install.sh | bash
source ~/.bashrc
nvm install --lts
node -v && npm -v
I got Node.js v24.22.0 with npm 11.19.1. Check the nvm repository for the latest version of the install script.
⏱ Real time: 44 s (video sped up).
opencode and OpenSpec
curl -fsSL https://opencode.ai/install | bash
source ~/.bashrc
opencode --version
npm install -g @fission-ai/openspec@latest
openspec --version
The opencode installer adds the binary to your PATH through ~/.bashrc. OpenSpec comes from npm. In the recording, I got opencode 1.19.1 (we upgrade to 2.0 later on) and OpenSpec 1.14.2.
⏱ Real time: 1 min 05 s (video sped up).
Part 4 — The Key and the Configuration
Storing the API Key Safely
The key lives in a file inside ~/.secrets, readable only by your user, and is exported as an environment variable from ~/.bashrc:
mkdir -p ~/.secrets && chmod 700 ~/.secrets
nano ~/.secrets/intern_apikey        # paste the key, Ctrl+O to save, Ctrl+X to exit
chmod 600 ~/.secrets/intern_apikey
echo 'export INKSTONE_API_KEY=$(tr -d "[:space:]" < ~/.secrets/intern_apikey)' >> ~/.bashrc
source ~/.bashrc
ls -l ~/.secrets/intern_apikey
echo ${#INKSTONE_API_KEY}
The last command only prints the key’s length, never its value. It is a simple way to confirm the variable was loaded without putting the secret on screen. The tr strips whitespace and the trailing newline that usually come along when you paste the key.
⏱ Real time: 56 s.
Testing the API
Before bringing opencode in, a direct curl call confirms that the key, the URL and the model are right:
curl -s https://discovery-api.intern-ai.org.cn/v1/chat/completions \
  -H "Authorization: Bearer $INKSTONE_API_KEY" \
  -H "Content-Type: application/json" \
  -d '{"model":"deepseek-v4-pro-0813","messages":[{"role":"user","content":"Answer in one sentence: what is spec-driven development?"}]}'
The response came back with the model’s answer and the token usage (17 input, 224 output, 160 of them reasoning).
⏱ Real time: 14 s (video sped up). In the recording I asked the question in Portuguese.
Configuring opencode
opencode accepts any OpenAI-compatible provider through the @ai-sdk/openai-compatible package. The configuration lives in ~/.config/opencode/opencode.json (see the Custom provider section of the docs):
mkdir -p ~/.config/opencode
cat > ~/.config/opencode/opencode.json <<'EOF'
{
  "$schema": "https://opencode.ai/config.json",
  "model": "intern/deepseek-v4-pro-0813",
  "small_model": "intern/deepseek-v4-flash-0731",
  "provider": {
    "intern": {
      "npm": "@ai-sdk/openai-compatible",
      "name": "Intern Discovery",
      "options": {
        "baseURL": "https://discovery-api.intern-ai.org.cn/v1",
        "apiKey": "{env:INKSTONE_API_KEY}"
      },
      "models": {
        "deepseek-v4-pro-0813": { "name": "DeepSeek V4 Pro" },
        "deepseek-v4-flash-0731": { "name": "DeepSeek V4 Flash" },
        "kimi-k2.6": { "name": "Kimi K2.6" },
        "glm-5.3": { "name": "GLM 5.3" }
      }
    }
  }
}
EOF
cat ~/.config/opencode/opencode.json
Notice "apiKey": "{env:INKSTONE_API_KEY}": the file holds no secret at all, it just points to the environment variable. opencode uses the small_model for lightweight tasks such as generating session titles.
⏱ Real time: 31 s.
Part 5 — The Project
Creating the Project and Initializing OpenSpec
mkdir -p ~/workspace/sdd-lab && cd ~/workspace/sdd-lab
git init
openspec init --tools opencode
openspec completion install
exec bash
openspec init --tools opencode creates the openspec/ structure and installs the workflow commands into opencode (/opsx-propose, /opsx-apply, /opsx-archive and others). completion install turns on Tab completion, and exec bash reloads the shell.
⏱ Real time: 30 s.
Installing the openspec-casadei Schema
OpenSpec works with schemas, which define the artifacts and the rules of each step. I maintain my own public schema, openspec-casadei. Among other things, it requires scenarios in the AS A / WHEN / THEN / AND format, at least one failure scenario per requirement, tests and documentation in every task group, and explicit approval for any new dependency.
cd ~/workspace
git clone https://github.com/vcasadei/openspec-casadei.git
cd openspec-casadei
./tools/install.sh --project ~/workspace/sdd-lab
cd ~/workspace/sdd-lab
openspec schema which casadei
The installer copies the schema into the project and switches schema: spec-driven to schema: casadei in openspec/config.yaml. If you prefer OpenSpec’s default schema, skip this step: the rest of the article works the same way.
⏱ Real time: 30 s (video sped up).
Upgrading opencode to 2.0
The first time I opened opencode inside the project, it already recognized the provider (“Build · DeepSeek V4 Pro · Intern Discovery”) and offered the upgrade to version 2.0, described at anoma.ly/notes/opencode-2-0. Inside opencode:
/update
⏱ Real time: 26 s (video sped up).
Choosing the Model
With opencode 2.0 open, /models lists opencode’s own free models plus the ones from the Intern Discovery provider. I picked DeepSeek V4 Pro and, at the next prompt, the high effort variant.
/models
⏱ Real time: 33 s (video sped up).
Part 6 — The First Spec: wordcount
Propose
This is the request I sent, exactly as I typed it (in Portuguese, since that’s how I recorded it):
/opsx-propose Criar uma CLI em Node.js chamado wordcount que recebe o caminho de um arquivo de texto e mostra quantas linhas, palavras, caracteres ele tem. Sem dependências externas. Arquivo inexistente deve gerar uma mensagem clara e código de saída 1. Incluir testes com node:test e coverage de 90%+In English: “Create a Node.js CLI called wordcount that takes the path of a text file and shows how many lines, words and characters it has. No external dependencies. A missing file must produce a clear message and exit code 1. Include tests with node:test and 90%+ coverage.”
The behavior was exactly what the OpenSpec workflow asks for: before writing any artifact, the model read the schema and the OpenSpec instructions and asked questions about what was ambiguous in my request.
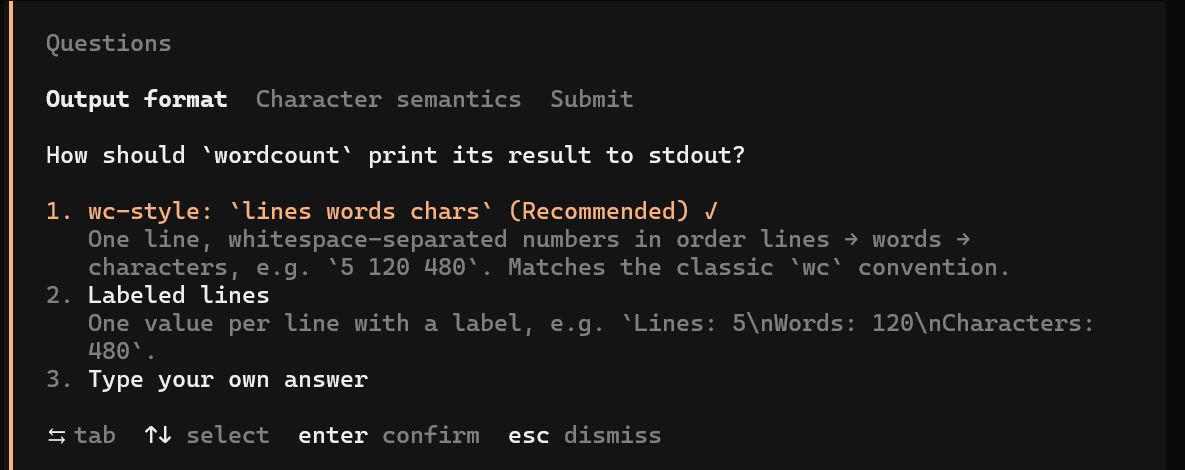
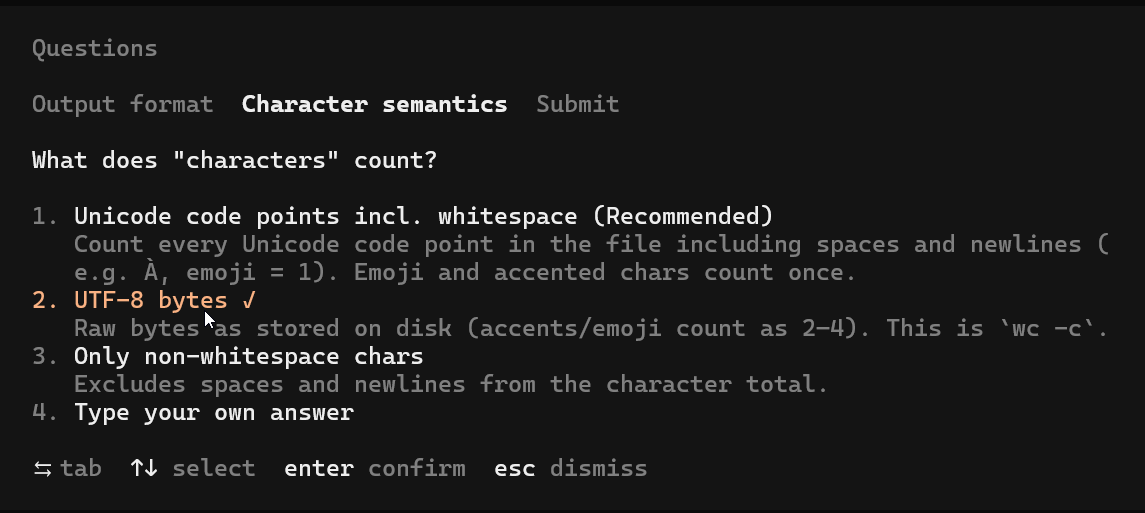
Both questions are worth discussing:
- Output format: I chose the
wcstyle (lines words charson a single line), which was the recommended option. It is the convention everyone knows and it is easy to use in scripts. - What counts as a “character”: here I went against the recommendation. The model suggested counting Unicode code points (an accent or an emoji = 1), and I chose UTF-8 bytes, which is what
wc -cdoes. That way the result is easy to check against a classic tool. “Character” looked obvious in my request, and it wasn’t: in Portuguese, “ação” has 4 Unicode characters but 7 bytes, counting the newline.
With the answers in hand, it wrote the four artifacts in openspec/changes/add-wordcount-cli/ and validated everything with openspec validate --strict:
proposal.md: the why and the what. A dependency-free CLI,lines words bytesoutput, exit code 1 on errors, 90% minimum coverage.specs/wordcount/spec.md: 2 requirements and 7 scenarios. Happy path, empty file, non-ASCII bytes, newlines, missing argument, missing file and directory.design.md: read the file as aBuffer, a purecount(buf)function with a thin CLI on top, CommonJS with no build step, and tests withnode:test.tasks.md: 8 tasks in 3 groups (counting logic, CLI and quality gates), each with a verification command.
⏱ Real time: 11 min 21 s (video sped up). opencode measured 10 min 13 s from sending the request to the final summary.
This is the moment to review calmly, before the apply. Nothing has been implemented yet: if something is wrong, fixing it now costs a paragraph, not a refactor.
Apply
/opsx-apply
The agent read the artifacts, checked the environment (Node.js, git, the native coverage options of node --test) and implemented task by task: package.json, lib/wordcount.js, bin/wordcount.js, the tests and a README.
The most interesting moment came at the end. The first run of npm run test:coverage failed: branch coverage was 87.5%, below the 90% I had asked for, because the CLI’s success path had no automated test. The agent did not lower the threshold. It wrote the missing test, ran the suite again, reached 100%, and even noted in its summary that it had done something beyond the literal task text. That is exactly the behavior we want: the rule came from the spec, not from the model’s goodwill.
⏱ Real time: 6 min 17 s (video sped up).
The apply in numbers:
| Time (measured by opencode) | 6 min 12 s |
| Tasks | 8 of 8 completed |
| Files created | 6 (package.json, lib/, bin/, 2 test files, README.md) |
| Tests | 8 (4 unit and 4 CLI), all passing |
| Coverage | 100% lines, branches and functions |
| Dependencies | none |
| Context at the end | about 85k tokens (43% of the window) |
Checking the Result
Outside opencode, in the terminal:
cd ~/workspace/sdd-lab
echo -e "uma linha\nduas linhas aqui" > exemplo.txt
node bin/wordcount.js exemplo.txt
node bin/wordcount.js nao-existe.txt
node --test
npm run test:coverage
The sample file returned 2 5 27, the missing file produced wordcount: file not found: nao-existe.txt with exit code 1, and all 8 tests passed with 100% coverage.
⏱ Real time: 1 min 01 s (video sped up).
Want to check the bytes decision? Run printf "ação\n" > accents.txt, then node bin/wordcount.js accents.txt and wc accents.txt. Both should print 1 1 7.
Archive
/opsx-archive
The archive does two things: it syncs the change’s spec into the project’s main specs (in openspec/specs/) and moves the change to openspec/changes/archive/ as history. Since this was the project’s first capability, the agent asked whether to sync before archiving. I chose Sync now: without it, the wordcount spec would live only in the history, and the next change would have nothing to build on. It created openspec/specs/wordcount/spec.md, validated it with openspec validate --specs --strict and moved the change to openspec/changes/archive/2026-10-15-add-wordcount-cli/.
⏱ Real time: 5 min 20 s (video sped up).
To check from the terminal: openspec list --specs.
What It Cost
At the end of the whole exercise, from sign-up to archive, the account still had 70% of the 5-hour limit and 94% of the weekly limit.
Troubleshooting
| Symptom | Cause and fix |
|---|---|
Sign-up doesn’t go through; the console shows 405 |
The site’s firewall blocks email sign-up. Log in with GitHub (a disposable account). |
opencode says invalid api key even though the key is set |
Almost always it’s the Windows opencode running inside WSL. Windows programs don’t see WSL environment variables. Check with which opencode node npm openspec: every path should start with /home/.... If one starts with /mnt/c/..., uninstall the Windows version. |
echo ${#INKSTONE_API_KEY} prints 0 |
The shell hasn’t reloaded. Run source ~/.bashrc or open a new terminal. |
| Propose or apply sits for minutes without the screen changing | It probably isn’t stuck: that’s the free tier. Wait. For lighter tasks, DeepSeek V4 Flash is faster. |
The opencode documentation has a page dedicated to Windows and WSL: opencode.ai/docs/windows-wsl.
Honest Limitations
- Speed. I’ve said it, but it’s worth repeating: a cycle that takes a few minutes with faster paid models took more than 20 here. Great for studying; a burden for daily work.
- Quotas and rate limits. 50 requests per minute and credits per time window are enough for studying, but a long apply session can hit the limit.
- Data. It is a free service hosted abroad under different laws. No third-party personal data, company code or secrets.
- Availability. Free services change their rules, their quotas, or go away. The good news is that opencode accepts any OpenAI-compatible provider: if Intern Discovery changes, you swap the URL and the key in
opencode.jsonand the rest of the environment stays the same. - Models vary. DeepSeek V4 Pro followed the OpenSpec and schema instructions very well. It is worth trying GLM 5.3 and Kimi K2.6 on the same tasks (just switch with
/models) and comparing.
The Takeaway
The main point of this exercise, for me, is that the method doesn’t depend on the tool. What brings predictability is the agreement written before the code: the reviewed proposal, the failure scenarios, the tasks with verification, the spec that becomes official documentation. With a completely different agent and model, the behavior was the same: the model asked before writing, implemented following the tasks, was stopped by a quality gate that came from the spec, and fixed the code instead of loosening the rule.
If you couldn’t practice SDD because you lacked access to a paid tool, now you can. Set up your own sdd-lab, run wordcount, and then try it with a project of your own.
References and Useful Links
- Spec-Driven Development
- OpenSpec · Documentation
- openspec-casadei, my public schema for OpenSpec
- Spec-driven development with AI: Get started with a new open source toolkit, GitHub’s article on Spec Kit
- opencode
- Models and API
- Environment
If this guide helped you set up your own environment or unblocked your SDD study, drop me a note on LinkedIn (linkedin.com/in/vcasadei) or check out other projects and essays I publish at vcasadei.com.